https://westgold.com/
Article content
"Food is best shot when it’s ready… piping hot out of the oven or just rested briefly."
-
Find the light
Photography is 99% about the light so you want to plan to shoot with light that will make your food look the best. Some tips for you….
a. Turn off the flash on your phone
b. Find some natural light – near a window is ideal
c. Turn off the other lights nearby – that will stop strange colours caused by different types of light
d. Backlight is great for food photography – what do I mean by that? It’s when the light is coming from the back of the photo and it gives the food lovely glossy reflections which is especially true for yummy buttery dishes!
e. If the sun is streaming through the window and is too bright, try hanging up a thin white sheet that will soften the light but still lets lots of light through. - Know your camera
Get to know the camera part of your phone which will be a bit different for each type of phone. If you want to have a bit more control over what you shoot then I would recommend looking for an app that lets you do that rather than the inbuilt camera.
a. Try to find an app that makes sense to you but allows you to change some of the settings especially exposure and colour temperature (also known as ‘White Balance’). There is a free version of Adobe Lightroom CC that has a pretty good camera feature and allows some editing options on the free version. Snapseed is also free and has some more advanced editing options built into the free version.
b. Experiment with different modes on your phone – my iPhone has a ‘portrait’ mode that tries to mimic how a professional camera has areas in and out of focus. Sometimes this looks terrible though so keep an eye on it!
c. Most phones aren’t good in low light – so overcast dreary days, or night-time aren’t great times to shoot food with them.
d. Clean the camera lens – mine always ends up with my kids (and my own) fingerprints smeared over it which is a quick way to ruin phone photos so get a clean t-shirt and give it a quick clean. - Pick your angle
When I’m choosing how to photograph a dish I generally run through a few standard options…
a. From above looking down
b. ‘Eating’ Angle as if you are looking at it when it’s just been placed on the table in front of you
c. Close up.
So how to choose? Well really it’s whatever you think will make the shot and the food look their best! From above is a popular angle although needs more styling/props and a nice simple ‘background’ like a table or bench. Some things need to be shot close up, especially if what you’re trying to showcase is something like a sauce or the juiciness of the meat or a small detail that could be lost. - Plan the shot setup
Before the food goes in the oven or even before you even start cooking, have a think about what the angle is and what you want to include in the shot. The more you can decide and set up beforehand the easier it will be when the pressure comes on and the dish is ready.
a. Use a similar sized plate, dish or food item as a ‘stand in’ so you can plan everything while you’re waiting or before you cook.
b. Have some handy things nearby ready if you need them – cloth, tongs and tweezers are often very useful!
c. If your dish/shot involves sauce or condiments get them all in place before the main dish is ready.
d. You could style it on a table with cutlery, or on the kitchen bench with the mess of making it included, or packaged up as a gift – get creative and have fun with different ideas. - Shoot it quick
Food is best shot when it’s ready… piping hot out of the oven or just rested briefly. If it’s waiting around for you to find props or get set up it’s not going to look it’s best when you take the shot.
a. If you’re photographing something like baking, look for the best biscuit/cupcake etc and make that the ‘Hero’. You may need to swap things around when you come to shoot so that the hero piece is in prime position. - Eat, Eat, Eat
Enjoy!
My Phone Photo Shoot- Cinnamon Pinwheels
- The Light
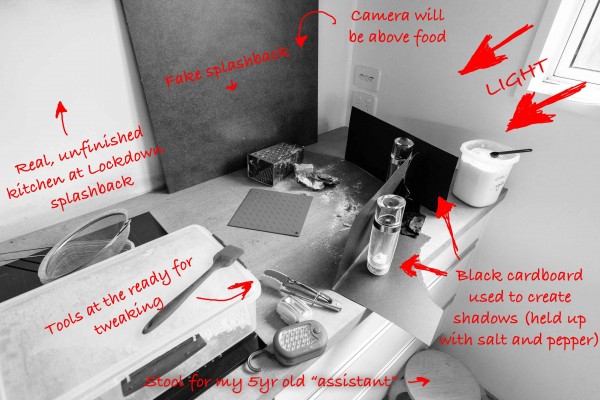
I had planned on shooting the pinwheels backlit to show the buttery caramel dripping out of them but then when I came to shoot it was a dreary, cold day so the plan had to change. I decided to embrace the wintery feel and shoot from above. I set up on the kitchen bench with a window adjacent. I found a camping head torch as well and thought I might use that to shine on the ‘hero’ – but it didn’t help at all as was too bright compared to the daylight so looked terrible! - The Camera
My camera for this shoot is my iPhone XS circa 2018 – so ancient in the scheme of phone camera technology but still decent. Newer phones will be noticeably better quality and better with low light situations which would have been handy for this shoot as some of the shots were blurry from camera shake. I was using the camera mode in Adobe Lightroom CC (which has a free version) and had changed the camera mode to “Pro” which allows the user to adjust the brightness, white balance and to shoot in a format called “Raw” which allows for a bit better quality when it comes to the edit stage. - The Angle
As I mentioned above I changed plans to shoot it from above – I tried to get a car phone holder to attach to the cabinetry to hold the phone in place but that was a fail. Once I thought I had a good shot I tried a few other angles, sometimes you will strike upon something better than the planned shot but in this situation, I didn’t. - The Shot Setup
I decided I wanted to include some of the “kitchen mess” in the shot for two reasons – firstly it looks really beautiful but also it connects with one of the preparation processes of grating cold butter over the pinwheels before and after you roll them up. Butter is in there and is clearly Westgold but without being over the top.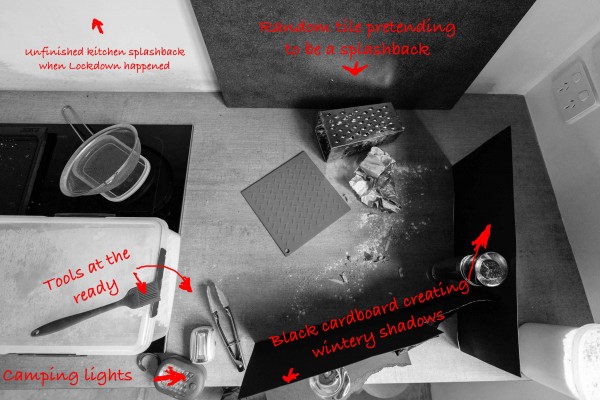
- The Shoot
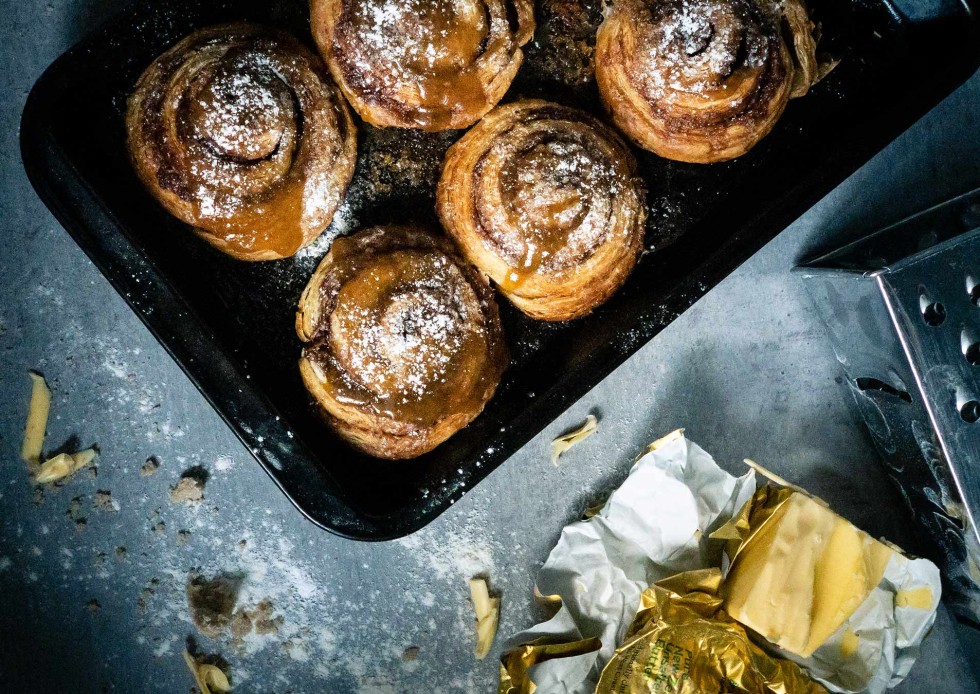
Once the tin was in place, I swapped two of the pinwheels to get the Hero one in prime position and then shot it with subtle differences – plain, dusted, dusted with extra caramel butter dripping over it and then dusted again over top of that. The end shot was the one I thought was best but I always shoot changes incrementally as you “can’t go back” if you pour too much sauce over it (if there is even such a thing as “too much sauce”). - The edit
In keeping with the challenge of this, I edited this using a free app called Snapseed. It’s not something I am familiar with but managed to figure out how to do a basic edit to give it a bit more of the cold winters day vibe I was looking for. To do this I adjusted the white balance adjustment to ‘cool’ down the image. Then I added contrast and darkened the shadows of the whole image before I used the “Brush” tool to add a bit of extra warmth and brightness JUST to the Pinwheels and butter. Finally, I cropped the image and added a bit of vignetting (darkening around the edges). I have put a before and after to give you a bit of an idea what it was like at first, and where I wanted to take it to.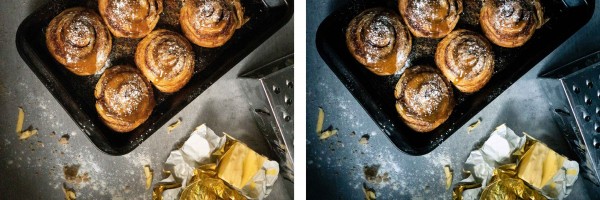

 Previous blog